Yo Scenario Frequently Asked Questions

Here are some FAQs for Yo Scenario.

← Help

Answer

Creating your first scenario is easy following these steps.

  1. From your dashboard press the "CREATE SCENARIO" button
  2. Fill in the create scenario form entering a value for the following field:
    1. Title The title of your scenario
    2. Description A text description of your scenario
    3. Image The image used as a thumbnail for your scenario
    4. Content Editor Add some intro content using the Content Editor
    5. Brand Select the brand you want to use for your scenario
    6. Config Optionally assign config variables to your scenario.
  3. Press the "CREATE SCENARIO" button to create your scenario
  4. Press the "CREATE FIRST STEP" button to create the first step
  5. Fill in the step form
    1. Title The title of your step
    2. Content Editor Add some content using the Content Editor
    3. Action Editor Optionally add actions to the step
    4. Config Optionally assign config variables to the step
  6. Add a choice pressing the "+" button under your new step and choosing "Choice"
  7. Repeat the above adding steps as choices as required
  8. When you're finished publish your scenario
  9. Track the activity on your scenario via the analytics
Answer

The content editor is an easy to use component based editor that makes it quick and simple to create your content.

To get started press the ADD SECTION button to create a new section. From here you can create a new row by pressing the ADD ROW button. This will bring up the column selector as show below. Each block represent a column in the row.

A screenshot of the application showing the column options


Press the row type you want to create the row. You can then press the ADD COMPONENT to add a component.

You will be presented with the component chooser with options for Visual components and Activities. A list of the available components are shown below. Press the one you want to continue.

A screenshot of the application showing the component options

Now fill in the component form to add your component. Here is the example form for an image component:

A screenshot of the application showing the component edit screen for an image

Answer

The action editor enables you to add advanced functionality to your scenarios with a simple event and action based system.

To add a new event (a trigger to perform the action) press the ADD EVENT button to bring up the condition selector modal. Select the condition you want to act as the trigger from the drop down (this list will vary depending on where the action editor is) and fill in any subsequent fields relating to the action. Then press the ADD CONDITION button to add a condition. You can add multiple conditions by pressing the + icon. Now you have an event you can add actions by pressing the ADD ACTION button to bring up the new action modal. Select the action from the dropdown list and fill in any related fields.

Answer

The config editor is used to setup configuration elements for scenarios, choices and steps.

To use the config editor select an option from the dropdown menu, fill in the field or fields and press the ADD button. You can use the config editor for a scenario to manage variables and score categories, two important parts of the Yo Scenario system.

Answer

You can setup Score Categories (sometimes referred to as "Score Cats") using the config editor in the manage scenario form. Select "Setup" from the scenario side navigation menu then in the config editor choose "Score Categories" from the dropdown menu. Now populate your category name and when you're finished press the ADD button. When they have all been added press the save button to save the config.

A screenshot of the application showing the score category config

Answer

You can setup scenario variables using the config editor in the manage scenario form. Select "Setup" from the scenario side navigation menu then in the config editor choose "Variables" from the dropdown menu. Now populate your variable names and initial value and when you're finished press the ADD button.

A screenshot of the application showing the scenario variables config

Answer

You can choose to make your choices to appear as buttons or speech bubbles. This can be chosen in the Style editor under Choices.

Select your scenario then choose "Style" from the side nav. Under "Choices" choose the required style.

A screenshot of the application showing the choice style  options

Answer

You can use curly braces to display a variable like to {var.variable} where "variable" is the name of the variable as defined in the scenario configuration.

Answer

Yes you can opt to show a component in six ways; on a variable being a certain value, on a score category being a certain value, on the top score category, on the bottom score category matching a value on the score being a certain value or on having and item in a toolkit.

To do this click on the settings icon on a component

A screenshot of the application showing the component conditions

Then under "Show When" select your condition, fill in the associated fields the press the ADD CONDITION button. Remember, when using "On Variable" or "On Score" you can prefix the value with an optional comparator of either >, >=, <, <= or !=. If no comparator is set it will default to "=" and perform a direct comparison.

Answer

Yes, you can preview your content by pressing the preview icon on the top right.

A screenshot of the application showing the preview button

This will open the preview view and show you how your content will look when published. You can use the Icons on the top right to toggle between desktop and mobile views.

A screenshot of the application showing the toggle viewport option

Answer

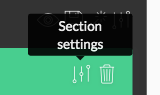
You can add an animation to a section view the section settings modal. Get to this by pressing the Section Settings icon on the section

A screenshot of the application showing the section settings link

This will bring up the settings modal. From here choose the animation and optional delay and press the save button.

A screenshot of the application showing the animation settings

You can follow the same process the add an animation to a component. Note - some components have a default animation setting that you can control form the style editor.


Answer

You can make full screen video steps by doing the following:

  • Create a new section, add a full width row then add a video component
  • Select your video file then check the Full Screen option and auto play if you want to to auto play
  • Now go to the section settings and set the content width to full width
  • You should also ensure that your container width is set to fluid via the contain settings

  • Your video will now play full screen. If you want to overlay the choices when the video finishes then add a step config variable of "Overlay Choices" to yes and "Hide Choices Till Video Finished" to yes

Note: There is a quick link to add this commonly used component setup. Use the template button at the bottom of the editor and select full screen video for quick access.

A screenshot of the application showing the template dropdown
Answer

You can do this by adding a row with a two column layout with a quote component on one side and a text component on the other.

If you want to keep the speech bubble and image side by side on all devices remember to select the relevant default breakpoint in the style editor. The breakpoint defines when the columns should drop to full width. By setting "None" as the default breakpoint the columns will remain on all devices. You can also set the breakpoint per step in the content editor settings for the step.

Note: There is a quick link to add this commonly used component setup. Use the template button at the bottom of the editor and select quote and image 50/50 for quick access.

A screenshot of the application showing the template dropdown